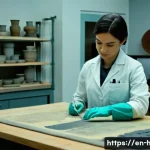
Embarking on the journey to become a certified Cultural Heritage Repair Technician is no small feat, especially the practical skills exam. It requires countless hours of practice, keen attention to detail, and the right tools to hone your craft.
As someone who’s been through the trenches, I know firsthand how crucial the right equipment can be in mastering the techniques needed to succeed. Finding the perfect practice tools can feel like searching for a needle in a haystack, but don’t worry, I’ve got you covered.
So, let’s find out exactly what you need to achieve success in this exam. Let’s delve into the specifics in the article below.
Alright, let’s dive into the world of Cultural Heritage Repair Technician prep!
Unveiling the Essential Toolkit for Aspiring Technicians

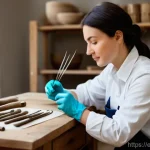
Quality Hand Tools: The Cornerstone of Precision
Every seasoned repair technician will tell you: your hands are only as good as the tools you wield. Forget those flimsy, bargain-bin sets. Invest in high-quality hand tools like chisels, scalpels, and carving knives made from durable materials like high-carbon steel.
I remember when I started, I cheaped out on a set of chisels, and let me tell you, trying to carve delicate details with dull, chipping blades was an exercise in frustration.
It wasn’t just harder; it actually increased the risk of damaging the materials I was working on. A good set should feel balanced in your hand, hold an edge well, and be easy to sharpen.
Brands like Flexcut or Two Cherries are a solid starting point. Don’t forget sharpening stones and honing oil to keep those blades razor-sharp. Trust me, your future self (and your future projects) will thank you.
Magnification and Lighting: Seeing is Believing
You might think your eyesight is perfect, but trust me, when you’re working on intricate repairs, you’ll need magnification and good lighting. We’re talking about repairing items that are not easily replaceable, and even using magnification will make it more manageable.
A good quality magnifying glass or a head-mounted magnifier with LED lighting is a game-changer. I personally prefer a head-mounted magnifier because it keeps my hands free.
Plus, a bright, adjustable light source is crucial. You want to be able to see every detail, every crack, every imperfection. I once spent hours trying to repair a tiny crack in a ceramic vase, only to realize with better lighting that it was actually a network of hairline fractures that needed a completely different approach.
Good lighting and magnification aren’t just about making the work easier; they’re about seeing the full picture and making informed decisions about your repair strategy.
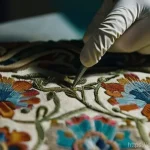
Mastering Material Manipulation: From Mortar to Pigments
Mortar Mixology: Getting the Recipe Right
Working with mortar is a fundamental skill, and mastering it involves understanding the nuances of different mixes. It’s not just about slapping some cement and sand together; it’s about achieving the right consistency, color, and strength for the specific material you’re repairing.
You’ll need a good mortar mixing kit, including various gauges of sand, lime putty, and the right type of cement. I recommend experimenting with different ratios and documenting your results.
A great way to get a feel for it is to practice on some scrap pieces of brick or stone. And remember, always wear a mask when working with dry mortar components to avoid inhaling harmful dust.
Pigment Perfection: Matching the Original Palette
Color matching is an art form in itself. Being able to accurately replicate the original colors of a cultural heritage piece is crucial for seamless repairs.
Invest in a high-quality set of dry pigments, a palette knife, and a glass slab for mixing. Start by understanding color theory and how different pigments interact.
Practice mixing small batches of color, comparing them to the original piece under different lighting conditions. It’s a painstaking process, but the result is worth it.
I once spent an entire day trying to match the exact shade of blue on a painted mural, and when I finally got it right, it was one of the most satisfying moments of my career.
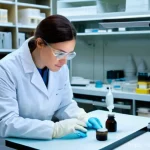
Essential Safety Gear: Protecting Yourself and the Artefact
Respiratory Protection: Breathing Easy
Working with historical materials often means exposure to dust, mold, and other harmful particles. A high-quality respirator is non-negotiable. Make sure it fits properly and has the appropriate filters for the types of materials you’ll be working with.
I’ve seen too many technicians take shortcuts with respiratory protection, and it’s just not worth the risk. Your lungs are precious, and protecting them should be a top priority.
Hand and Eye Protection: A Shield Against Damage
Gloves and safety glasses are your first line of defense against cuts, abrasions, and chemical exposure. Choose gloves that are appropriate for the materials you’re working with, whether it’s nitrile gloves for handling solvents or leather gloves for carving stone.
And always, always wear safety glasses to protect your eyes from flying debris. I know it might seem like overkill sometimes, but trust me, it’s better to be safe than sorry.
The Digital Age: Leveraging Technology for Preservation
Digital Calipers: Precision Measurement for Perfect Fit
Gone are the days of relying solely on rulers and eyeballing measurements. Digital calipers offer unparalleled precision for measuring everything from the thickness of a veneer to the diameter of a dowel.
They’re especially useful for replicating missing components or creating custom-fit repairs. I remember when I first started using digital calipers, it completely changed the way I approached repairs.
Suddenly, I was able to achieve a level of accuracy that was simply impossible before.
Documentation Tools: Capturing Every Detail
In today’s world, documentation is just as important as the repair itself. Invest in a good quality digital camera and learn how to take detailed photographs of your work.
Before and after photos are essential, as well as close-up shots of any damage or repairs. You can also use video to document complex processes or techniques.
Furthermore, don’t forget to keep detailed written records of your work, including materials used, techniques employed, and any challenges encountered.
This documentation will not only help you track your progress but will also be invaluable for future reference and for sharing your knowledge with others.
| Tool Category | Specific Tool | Why It’s Essential | Recommended Brands |
|---|---|---|---|
| Hand Tools | Chisels, Scalpels, Carving Knives | Precision carving and shaping | Flexcut, Two Cherries |
| Magnification & Lighting | Head-Mounted Magnifier with LED | Enhanced visibility for intricate details | Donegan OptiVisor, Carson Optical |
| Mortar Mixing | Mortar Mixing Kit (Sand, Lime, Cement) | Achieving the correct mortar consistency and color | Sakrete, Quikrete |
| Pigment Mixing | Dry Pigments, Palette Knife, Glass Slab | Accurate color matching | Kremer Pigmente, Sennelier |
| Safety Gear | Respirator, Gloves, Safety Glasses | Protection from harmful particles and physical injury | 3M, Honeywell |
| Digital Tools | Digital Calipers | Precise measurements | Mitutoyo, iGaging |
| Documentation | Digital Camera, Notebook | Detailed record-keeping | Canon, Nikon |
Practice Makes Perfect: Honing Your Skills
Setting Up a Practice Station
Create a dedicated practice space where you can experiment and hone your skills without worrying about damaging valuable artifacts. Gather a variety of materials to work with, such as old bricks, tiles, and pieces of wood.
And don’t be afraid to make mistakes. That’s how you learn.
Simulating Real-World Scenarios
Challenge yourself by creating simulated real-world repair scenarios. For example, you could create a mock-up of a damaged wall and practice repairing it using different techniques.
Or you could try replicating a specific type of damage, such as a chipped corner or a cracked surface.
The Importance of Continuous Learning and Networking
Workshops and Seminars
The field of cultural heritage repair is constantly evolving, with new techniques and materials being developed all the time. Attend workshops and seminars to stay up-to-date on the latest advancements and to learn from experienced professionals.
Building a Professional Network
Connect with other technicians, conservators, and preservationists to share knowledge, exchange ideas, and learn from each other’s experiences. Attend conferences, join professional organizations, and participate in online forums.
Building a strong professional network will not only help you grow as a technician but will also open up new opportunities for collaboration and advancement.
Equipping yourself with the right tools and knowledge is the first step toward success. Remember, becoming a certified Cultural Heritage Repair Technician is a journey, not a destination.
Embrace the challenges, stay curious, and never stop learning. Good luck!
Wrapping Up
So, there you have it—a glimpse into the essential toolkit and skills required to embark on a career as a Cultural Heritage Repair Technician. It’s a path filled with challenges, but also immense satisfaction. Remember to prioritize safety, continuous learning, and building a strong professional network. Good luck on your journey to preserving our shared history!
Handy Tips & Tricks
1. Always document your work thoroughly, including before-and-after photos and detailed notes. A good practice is to maintain a journal or digital log of your projects, techniques, and materials used. This will be invaluable for future reference and can also serve as a portfolio of your work.
2. Consider starting with volunteer projects at local historical societies or museums to gain practical experience. Volunteering not only allows you to apply your skills but also provides networking opportunities and exposure to different types of artifacts and conservation challenges.
3. Explore opportunities for specialized training in areas like ceramics, textiles, or woodwork. Many community colleges and vocational schools offer courses in these disciplines, which can significantly enhance your skill set and make you a more versatile technician.
4. Familiarize yourself with the ethical guidelines and standards of practice for cultural heritage conservation. Organizations like the American Institute for Conservation (AIC) provide valuable resources and information on ethical considerations in the field.
5. Invest in a good quality digital microscope for examining minute details and identifying materials. A digital microscope allows you to capture high-resolution images and videos, which can be incredibly useful for diagnosing problems and documenting your work.
Key Takeaways
• Invest in high-quality hand tools and learn how to maintain them properly.
• Master the art of mortar mixology and pigment matching.
• Prioritize safety by using appropriate respiratory, hand, and eye protection.
• Leverage technology for precise measurements and thorough documentation.
• Continuously learn and network with other professionals in the field.
Frequently Asked Questions (FAQ) 📖
Q: I’m just starting out and the practical exam feels overwhelming. What’s one piece of equipment you absolutely couldn’t have lived without when practicing?
A: Honestly, a really good set of precision knives was a game-changer for me. Not those flimsy hobby knives, but proper, high-quality scalpels with a variety of blade shapes.
I spent countless hours practicing delicate cleaning and repair techniques on mock-ups, and having that control and sharpness made all the difference.
I’d almost say it’s like a chef needing his favorite knife. You just can’t achieve the same level of detail without them. Find a set that feels good in your hand; comfort is key when you’re spending hours meticulously working.
Q: Besides the obvious tools like knives and brushes, is there anything else that might surprise people that’s super helpful for preparing?
A: You know, a really good magnifying lamp. It’s so easy to miss tiny cracks or imperfections, especially when you’re tired. I used one with adjustable brightness and magnification and it honestly saved my eyes and improved the quality of my work tenfold.
Plus, don’t underestimate the power of good lighting in general! Proper illumination can make a huge difference in spotting subtle damages that you might otherwise overlook.
It’s like trying to paint a masterpiece in a dimly lit room; you just can’t see the details properly.
Q: Okay, so I’ve got the tools and the magnifying glass. But what about practice materials? Where do you even find things to practice repairing that are similar to what’s on the exam?
A: That’s a great question! I scoured antique shops and flea markets for inexpensive, damaged objects. Think broken ceramics, old wooden picture frames, tarnished silver-plated items – anything that resembled the types of materials and repairs we’d be tested on.
The key is to find things that allow you to practice a range of techniques, from cleaning and consolidation to filling losses and retouching. I even practiced recreating specific types of damage, like simulating water stains or insect damage, just to get comfortable with the different repair approaches.
A good tip I learned was to ask the shop owners for items they were getting ready to throw out. Sometimes you can snag some treasures for free!
📚 References
Wikipedia Encyclopedia
구글 검색 결과
구글 검색 결과
구글 검색 결과
구글 검색 결과
구글 검색 결과